Monday, July 18, 2011

Every Inchie Monday - Books

The theme for Every Inchie Monday this week was "books".  I loved the theme!  I am a complete foreign text book junkie.  My favorite are Latin books but they're so hard to find...or if you do find them they tend to be too expensive..I've been lucky to find 4 Latin books over the years that weren't too pricey.  I have over 20 other books in my collection including Latin, French, Italian, Greek, Russian, Japanese and some American dictionaries.  For this weeks inchie I pulled pages from my foreign text books and cut strips of text as thin as I could get them.

I started with layers in two directions from every foreign text book I owned.  I cut the strips thin, removing all the blank white space and glued them down with a glue stick and let them dry thoroughly. 

To finish off the inchie (although I liked it without color) I added swirls of colored chalk in various blues and greens.  My favorite way to add chalk is to use little pom poms that you can get at Micheal's or AC Moore.

What do you think?

Sunday, July 17, 2011

Card: 17 Year Anniversary Card

Every time I make a card for Allen, I try to do something "out of the box" that he hasn't seen, because of course he's seen just about everything I've done before.  A couple weeks ago, I saw Joanne Sharpe's blog post at Creative Imaginations Blog  and I knew I had to try drawing with my dimensional paints.  I've used them before to add dots or lines to a piece, but never thought of drawing with them.  I had so much fun!  I didn't have any of the Radiant Rain paints she suggested for filling in...but they're definitely first on my "time to treat myself/what to buy next" list.

The background of this card are pieces of foreign text pages covered with watered down acrylic paints and splattered with gold metallic acrylic paint.  The heart and "iloveyou" was written with the $1 dimensional fabric paint in shiny black they have at Micheal's.  I cut out the heart and made it raised with double sided puffy tape available at Office Max.

Allen loved the card.  Inside I wrote a list of things I love to do with him.  We had a really fun anniversary yesterday and sometimes it feels like just a few years even though it's been 17 years together!

Thanks Joanne for the inspiration!  And Allen, it's been an amazing 17 years love :)

Monday, July 4, 2011

Every Inchie Monday - Sweet

When I thought about the theme this week for the Every Inchie Monday challenge, I wanted to use the yummy colors of candy and I thought about the inchie I made a few weeks ago that was orange and pink and sort of delicious looking.  I made two new inchies this week and put them together with the inchie from a few weeks ago and made them into a card to send my Mom.  She really loves my inchies, although her sight is a bit compromised being a bit older, she always comments on the details that I include in my inchies.  I really love trying to squeeze as much as I can into a little inch...it's such a fun challenge!  The card I made from her is below.

Sunday, June 26, 2011

Card: Marvin and Annette's Wedding

 Last week was my nephew Marvin's wedding.  He found Annette about a year ago and she's so bubbly and fun!  I'm so happy for them both!  I of course had to make them a card and found this little phrase a few months ago and wrote it down, I think it's perfect for a wedding or anniversary card.

The background is painted vintage music paper ripped on the edges and splattered with gold paint.  I also splattered the envelope and inside of the card with gold paint.  The middle ground papers are two different gold foil patterned papers on cream from India.  The front paper is card stock that I had lettered.  I think a border was needed around the lettering, but I didn't have the room once it was done.  This card took about 4 hours to make...not sure if I'm poky or picky! ;)
I hope they like it!

Sunday, June 12, 2011

Step-By-Step: June Calendar Page

I finished June's calendar page a few days after June started...I always seem to do that.  Anyway, I am so into the green in my yard and all around me this time of year I thought the page should be as green as possible.  This background is splattered watercolor and watered down acrylic paint through a stencil of abstract squares.  

The day squares are made from lime green watercolor paint applied to cardstock.  There's a bit of brush marks on the squares that the camera didn't really pick up.

The finished page has June written in water based Sharpie paint marker.  I also stamped a few images around the edges in black StazOn ink.  I was really happy with how the individual day squares turned out, I just loosely brushed watercolor around each square and then added the day number in black gel pen.

I hope you have a ton of wonderful things to remember in June!  Happy green days!

Thursday, June 2, 2011

Tutorial: Frosted Glass Candle Holders

 With our new table out on the deck finally delivered, I thought it was time for new candle holders outside.  I started with simple glass votive and round candle holders from Micheal's as the base.  Using an X-Acto knife on a healing pad with a ruler, I cut varying lengths and widths of masking tape.

I covered each of the candle holders with lots of strips of tape.  Using Krylon white frosted glass paint, I painted each of the glass holders with two coats of paint letting the first coat dry before I did the second coat.  Use a sweeping motion from side to side to apply the paint. 

I let them dry for about an hour before removing the tape.  Pretty fun!

I really like them when they're lit up at night.  See the wonderful patterns the cast behind them?

I hope you enjoyed this step-by-step process.  Happy summer!

Monday, May 30, 2011

Every Inchie Monday - Home


This week at Every Inchie Monday the theme was "home".  I truly do love my home and my yard, especially at this time of year when everything is green and we're planting new things. 

This inchie was made with colored foreign text pages and acrylic paint and a very pointy detail scissors.

Tuesday, May 24, 2011

Tutorial: Checkered Art Journal Background

Here is one of my favorite techniques for creating a multi-layered background that can be as colorful or as subdued as you want it to be.  Plan to get a bit messy with this fun process.

 
 Start by taking text printed pages from vintage books and give them some color.  Using inexpensive acrylic paints, squirt a line at the top of the book page and drag the color down with a plastic gift card or old credit card.  Watery, inexpensive acrylic paints work best for this...save your expensive acrylics for a later step.

Make a  bunch of pages like this with lots of bright colors.  Brighter, dark colors work best for this.

Rip the pages up and make a patchwork page of the ripped pieces.  You can paint the background pages first if you want, but here I left them white. Glue the colored text pieces down with a glue stick or gel medium.

Put a thin, watered down layer of white paint or gesso over the colored patchwork.  The less you use, obviously the more color that will show through.  I vary the amount of white, but on this spread I used a lot of white and really blotted out the colors for a more subtle effect.

Use a cosmetic sponge to create a checkerboard of squares using white or off white paint.  Here I tend to use a higher quality brand of acrylic paint that isn't so watery because it's more opaque.

Fill the entire page with a checkerboard.

Outline some of the squares with metallic acrylic paint in a random pattern using a paintbrush.  I outline about 1/3 of the squares.  My favorite brand of metallic paint is Utrect Iridescent Gold. This adds just a touch of interest to the entire layout.

Now you have a background ready for all different applications and lots of layers if you so desire.  Below are two ways I've used this background.

On this page my background papers were dark red, green and purple.  I put ripped pieces of a paint blotter page on the left and right side filling in the page with writing.

For this page I used all blue and turquoise text pages for the under layer.  I also used a glaze of blue paint on the outside edge and then filled the inside with text and babblings.

What do you think?  If you try this technique I'd love to see what you do!

Wednesday, May 18, 2011

Step-By-Step: A Striped Page in Beth's Journal

About once a month, Beth and I exchange Moleskin journals.  We were paired together from one of my online art journal groups last Fall and it's an absolute blast getting her journal to work in and see what she's put into mine each month.  Here is a spread of pages I did in her journal...

I started by stenciling through scrapbook paper with acrylic paint in dark purple.  I then put a wash of lighter purple paint to color the spaces in between.

 This piece of cardstock I decorated a while ago with splatters of watercolor paint.  I then drew random swirls around the paper with a black Pitt pen.  Using a ruler and Exacto knife I then cut the paper.

I cut the paper into strips that weren't uniform in width for interest.  Using a glue stick I attached them to the page leaving about a 1/4-1/2" in between the strips.

Because the book is so fat, I found it easiest to simply cut off the excess with a detail scissors.

The last step was to fill in some writing.  I used a Glaze black gel pen on the purple parts.
I hope she likes this spread!

Monday, May 16, 2011

Every Inchie Monday - Fancy


I was almost going to skip this week at the Every Inchie Monday challenge...I'm just not a "fancy" type of person (fancy being the theme this week)...but then I remembered all the tiny rhinestone flat backs I have and once again I was able to jump to the challenge.  I love when I work outside my comfort zone...I think it makes me a better artist.  This inchie was created with a weave of watercolor splashed paper and 2mm rhinestone flat backs from Preciosa.  I love Preciosa crystals...they're about 1/2 the price of Swarovski crystals and the sparkle and colors are amazing.  I hope your week is full of sparkle!

Monday, May 9, 2011

Every Inchie Monday - Pink

The theme for Every Inchie Monday this week was pink.  Honestly?  Ick...I hate pink.   But...I love a good challenge and stepping outside the familiar color themes I usually use was actually kind of fun.  I dug through my scrap bins looking for pink...there wasn't much to choose from, but I found a piece of watercolor paper that had been splattered in both orange and pink and things just fell into place after that.  I love working on such a tiny little canvas and seeing what I can put in such a small space.

This inchie was created simply with a bunch of little scraps of paper, all different shades of pink.  The paper flower was colored with ink and the rhinestone was glued on with gold glitter puffy paint.
 

 Here are two of my scrap bins.  The one on the left is a Godiva chocolate box filled with itty bitty scraps and the shoe box size box on the right is filled with smaller scraps.  I also have a medium size scrap box.  Soooo many scraps...what to do with them all?  Join the Every Inchie Monday challenge and start using your little scraps!

Link Love:

Sunday, May 8, 2011

Playing in the yard

Not a whole lotta art going on this weekend, instead we've been playing in the yard.  It was a bit too early to buy all the annuals we wanted, so we got what we could and will do the rest of the yard next weekend.  This weekend we mainly did the pots for the deck and planted a couple of perennials.

 
Empty pots waiting to be cleaned of their leftover dirt from last year and filled with new dirt and flowers.

 Our back deck is shady so impatiens are about our only choice for bright color.


I love our two new perennial additions to our sun bed, these are spring blooming Columbines, one in pink and one in a bluish purple.  I have to admit I'm a junkie when it comes to blue flowers...they're not very common are they?

It was a gorgeous sunny weekend here in Pennsylvania, not too warm not too chilly.  I hope it's gorgeous where you are and filled with spring flowers!

Thursday, May 5, 2011

Step By Step Calendar Page - May

I finally got started on May's calendar page just a couple days before May started...it came to me pretty quickly...my backyard is starting to green up and I wanted the page to mimic all the gorgeous greens!  Here are the steps I went through to make the page:

First I splattered two pieces of card stock with green and turquoise watercolor.

Next I painted another piece of cardstock with a pale green watercolor and cut out my squares.  The leaves are cut from Latin text pages painted with green and turquoise acrylic paint.

I then outlined the leaves with a water based Sharpie paint marker and spritzed watered down ink on the squares.  

The last step was to outline each day with the Sharpie marker and number them.  I also lettered the large "May" in Sharpie paint marker and colored it in with darker turquoise watercolor and used the same paint to outline the days of the month.
Now it's time to start filling in the days...


Wednesday, May 4, 2011

Calendar Pages

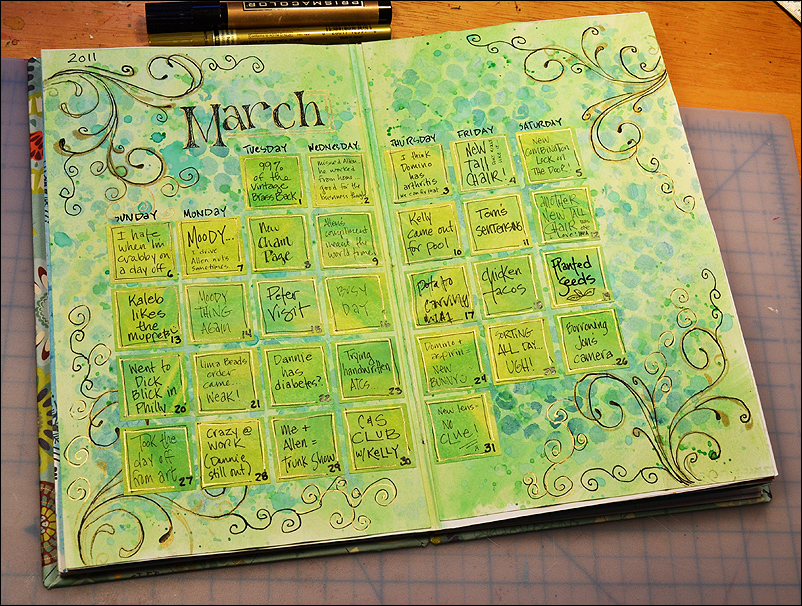
At the beginning of the year, I saw a lot of people making calendar pages where there was a little space for each day...write an event or something special that happened each day...sounded like a fun project and I jumped right in.  Here are the pages I've made so far this year.  The square for each day measures 1.25 inches...

 January was made with splashed watercolor, Perfect Pearls splashed on, swirls drawn with water based Sharpie paint markers and a snowflake stamp.

February was made with hearts painted with masking fluid and the heart cut outs decorated with medium point gel markers.

March was made with splashed on watercolor (can you tell I love this technique?), watercolor on bubble wrap printed on the splashed background and swirl stamps were highlighted with metallic paint pens.

 April started out with a watercolor background, gold paint sponged through punchinella and rabbit stamps around the border with pigment ink.

As usual, I waited until the last minute to start May (where do the days go?) but I hope to finish it tonight and I'll post it tomorrow.  Lots of green is going on to mimic my backyard that is starting to green up so beautifully! 

Monday, May 2, 2011

Every Inchie Monday - Heart


The theme for Every Inchie Monday this week is heart...easy, I love working with hearts.  I used different foreign text pages and some tiny little scraps of handmade paper.  Like last weeks inchie, I used black acrylic paint and a cosmetic sponge to apply black paint to the edges of the inchie and the heart...the heart was tricky since it was so tiny.
Related Posts Plugin for WordPress, Blogger...